
A movie without transitions would seem very awkward. When moving from one scene to another, transitions make the viewer understand that the scenes have changed. It is a great way of easing the viewer from one part of the story into another. Transitions are great for showing changes in time, venue, and circumstances, among many others. Without the transitions, the viewer would be left shocked, and only realize the change after about 5 to 10 seconds. This would not make fro very good viewership. iMovie, like most other video editors, comes with tools which you ca use to include transitions in your work. They will help you in creating a seamless video production.
Part I: Step by Step Tutorial on Adding Transitions in iMoive
Part II: Use iOrgSoft Video Editor for Mac to Add Transitions to Movie
1) Open you project in iMovie, and then go to the timeline where the video clips are displayed. Depending on where you want to add a transition, go to the timeline and place the playhead in between the two clips in question.

2) Go to the "Transitions" button on the viewer and click on it; the transitions screen will be opened and you can see the different types available to you. Before you select the transitions that you want, it would be a great idea to browse through them and preview how they will be played on the video. Simply select a transition, and you will see a preview of it.
![]()
3) Change the speed of the transition to suit the time you want it to take. There is a slider in the transitions window that you can use to change the speed. The default, and maximum, speed is 4 seconds; the shortest setting is a tenth of a second.
![]()
4) Once you are happy with the preview of the settings that you have chosen, you should drag the blue icon on the right side of the transitions name, into the timeline.
![]()
5) Allow the transition to be rendered into the project. Once it is rendered, you can get a real-time playback of it on the viewer.
![]()
6) If you are not happy with any of the settings of the transition, you can adjust them in the transitions screen.

The transition that you choose should make sense to the storyboard. If you want to transition between two fast action clips, then using a shorter transition period is best. If you are transitioning between two slow action clips, then a slow transition is best; you could even use a fade to black transition, and then fade back in from black. If you want to move from a fast clip to a slow clip, you should use a slow transition, and when moving from a slow action clip to a fast one, then you use a fast transition period.
When you want to delete any transition, you should simply click on it in the timeline and then hit the delete button.
There are many types of transitions and you should use these wisely; you do not have to have a sample of every transition in the program in your project. Select at least 3 or 4 and then use them sparingly. If you have all sorts of transition types in the production, then your work will start looking like a scrapbook rather than a fantastic video production.
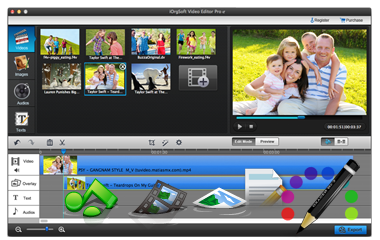
iOrgSoft Video Editor for Mac should be your choice if you are keen on making video but you don't want something complicated. It is an easy-to-use video editing program that provides you with basic yet professional video editing features, including clipping, cropping, transitions, brightness/contrast/saturation adjusting, splitting, rotating, flipping, etc.
Secure Download
Secure Download
1) Start by importing the movies that you are working on, and then drag them to the timeline so you can select the two video clips which you want to transition between. Click on the "story model" icon which under the viewer so that you can switch the timeline model to story model, which make it more easily to add transition.
2) Click on the "Add Transitions" icon, and you will see a number of transition effects in the window, including "slide", "Fade" and "3D" series. Once you have decided on the transition to apply, drag the it to the place between two clips on the story board. You can see how the effect look like by clicking on the play button on the play window. Or you can click on the "Preview" button to preview it.
3) Move on if you need to apply more editing effects to your video. When done, just click on the "Export" button to choose output format and customize output parameters and then export the project.


Terms & Conditions| Privacy| Sitemap| Contact Us| About Us| Affiliate| Newsletter| License Agreement| Uninstall
Browser compatibility : IE/Firefox/Chrome/Opera/Safari/Maxthon/Netscape
Copyright © 2007-2016 iOrgsoft Studio All Rights Reserved