
Applicable people?
It is a useful tool for you to find your lost and deleted video, image, and txt etc files back on Mac. There are 4 modes of iOrgSoft Data Recovery for Mac: "Lost Files Recovery", "Raw Recovery", "iPhone Recovery from iTunes", "Resume Recovery".
Secure Download
Secure Download
Lost Files Recovery: This mode mainly recovers files that you’ve moved to trash bin, or deleted by "Comman+Delete". It’s the initial recovery. If you cannot find your files with this mode, then move to the next mode, "Raw Recovery".
Raw Recovery: This is also called deep-scan mode, which enables to scan all the historical files that have been deleted due to virus, damaged, and formatted on Mac. With this mode, you can find all the lost files ever been on your Mac even though you’ve reinstalled the Mac.
iPhone Recovery from iTunes: This is a mode specially for recover the files from your iPhone, iPad, iPod, etc that once backed up in iTunes. If you occasionally delete the backup files in iTunes and you want them back, then you can use this mode.
Resume Recovery: With iOrgSoft Data Recovery, you can stop the recovery process whenever you have already found the files you need. Then the tool will indicate you to save the scanning result for you to resume the recovery in the future.
When operate the Data Recovery, you should first choose one mode due to the file you need to recover.

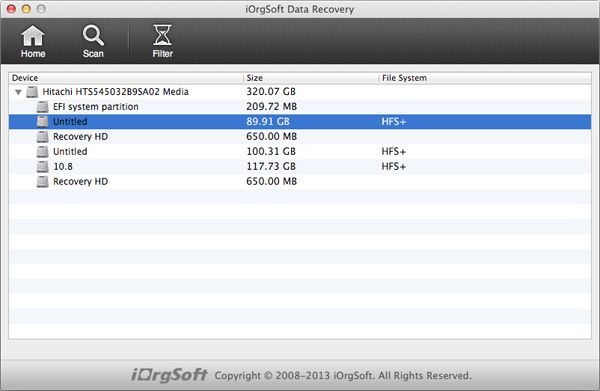
In this step, you need to pick the drive you want to scan. Moreover, you can hit "Filter" to select the file type you want, image or audios or videos, documents, etc. If you want to scan the whole drive, you can just strike "Scan" to begin.
Select drive
Scan lost files

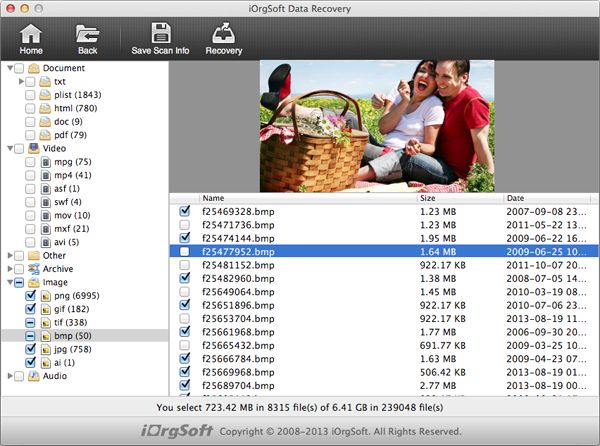
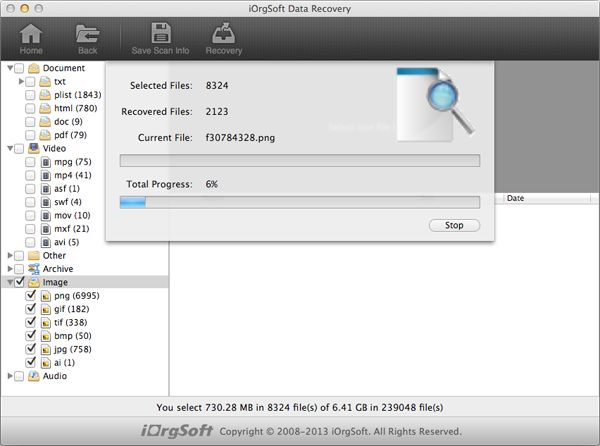
As to the scanning, you can stop the process whenever you want. There’s "Save Scan Info" button to save the current scanning result for you to continue scanning in the future. After scanning, you can tick the file you want to recover. You can also preview the files in the preview window for you to select the exact files you want it back. Next, you can finally hit "Recovery" icon to begin the recovery.
Preview
Recover
P.S. After the recovery process, there’s a window to tell you the process has been finished. And when you hit "OK", it will lead you to the recovered files for checking.

$35.00
Easily and quickly convert from HD/SD videos to common video formats with no quality loss.
![]()
![]()

$39.95
Mac DVD burning program to burn videos to DVD on Mac and create DVD menu with stylish template.
![]()
![]()
$99.95
Help play Flash SWF files without Adobe Flash Player on any device and app via simple conversion.
![]()
![]()


Terms & Conditions| Privacy| Sitemap| Contact Us| About Us| Affiliate| Newsletter| License Agreement| Uninstall
Browser compatibility : IE/Firefox/Chrome/Opera/Safari/Maxthon/Netscape
Copyright © 2007-2016 iOrgsoft Studio All Rights Reserved