
You might have shot many videos on the weddings, during a trip, on the birthday party, on the special day like your children's first day to kindergarten, to college and the like. You might want to find a way to better storage those precious moments or share to your families and friends. The best way to do so is to burn the video files to a DVD disc. Or you may have downloaded some wonderful movies online and want to enjoy them on large TV screen via DVD player. Here, you'll find various ways to burn DVDs on Mack OS X Mavericks.
1. iDVD
Since iDVD no longer by default comes with every new Mac since Lion, you need to purchase a copy of the iLife 09 disk to obtain the iDVD application. You can purchase from Amazon: iLife 11 software.
According from some Mavericks users who posted questions on Apple discussions community, iDVD 11 doesn't work properly on OS X 10.9.1 with an error message "to check with the developer to make sure iDVD works with OSX" while iDVD 7.1.2 works fine. So, we suggest you install iDVD 7.1.2 instead of iDVD 11.
When you get iDVD 7.1.2, you can burn slideshow or video out of iPhoto. You should export the slideshow or video as a QuickTime movie file. Then open iDVD, select a theme and drag the exported QT movie file into the opened iDVD and start burning.
Or you can create a DVD with iMovie with the help of iDVD. When finishes editing your video in iMovie, go to "Share" from iMovie 's top menu bar and choose "iDVD". And then wait for iDVD to open with your video in it. Next, create a new name for your DVD project and choose a DVD theme. Finally, insert an available DVD disc and click the "Burn" icon on iDVD to start burning iMovie project to DVD.
2. Burn a DVD in the Finder
Note that to burn a disc you need a built-in optical drive or one connected directly to your computer instead of a remote optical drive.
Firstly, please insert a blank DVD disc into the optical drive. Then you'll receive a dialog. Select "Open Finder" from the pop-up menu. Then the disc turns up on the desktop.
Secondly, double click to open the disc window. Drag the targeted files and folders to the window. Aliases to the files are placed in the disc's window.
Thirdly, please arrange and rename the files.
Finally, start burning disc. Please select "File>Burn" and then follow the instructions. The files that the aliases point to will be burn to the DVD disc. And, if the folder added to the disc has aliases, the original files of those aliases will also be burn to the DVD disc.
3. iOrgSoft DVD Maker for Mac
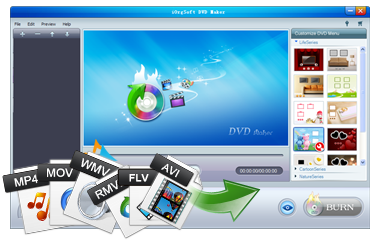
iDVD can only burn DVD from QuickTime movies, then, what if you need to make a DVD from video files other than QuickTime movies? That's the reason why we recommend you iOrgSoft DVD Maker for Mac. It supports to burn videos in nearly all video formats including MOV, WMV, AVI, MP4, VOB, RM, RMVB, MKV, FLV, 3GP, AVCHD, MTS, M2TS, MXF, MOD, TOD, XAVC, etc to DVD with ease. It can burn videos not only to DVD disc but also to ISO files. And it provides you with many free DVD menu templates. If you don't like the templates, you can choose not to adopt DVD menu templates or replace the background with your favorite picture. Also, it offers editing tools like video trimming, cropping, rotating, watermark, etc to customize your video before burning to DVD. Download the iDVD alternative now for a free trial.
If you are Windows users, you can refer to iOrgSoft DVD Maker for Windows. The windows version is a great alternative for Windows DVD Maker.
iOrgSoft DVD Maker for Mac provides Mac OS X Mavericks users with an easy way to create DVDs from videos in various formats.
Secure Download
Secure Download
After download and install the program, please launch it. You'll receive a message asking you whether to register the program, to order the program now or to order later. If you have purchased the registration code, you can directly enter the license name and license code. If not, you can order later after free trial. To have a free trial, please click "Order Later".
After enter the main interface of the program, please insert a blank DVD disc if you got an available one at hands. If you don't have one, you can burn the videos to ISO files first and then use the optical drive on your machine to burn the ISO files to DVD later when you got an blank DVD disc.

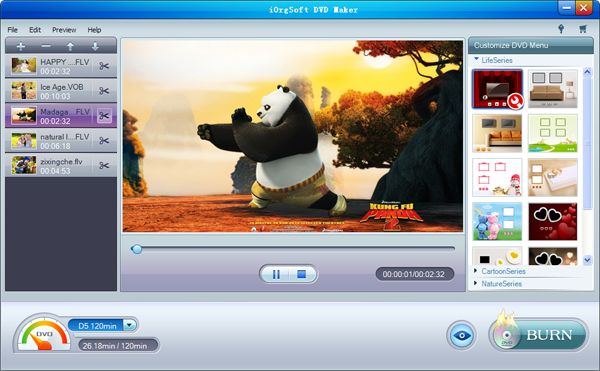
NTo add videos, please click the "File" menu and choose "Import" to add local videos. Or you can click the "+" button to import native videos.
After importing videos, you can use the "↑" or "↓" icon to determine which video comes first and which one follows up. If you add a video by mistake, you can use the "-" to delete it.
Please note that you should pay attention to the video length. Make sure the total video length is not over the capacity of your DVD disc.
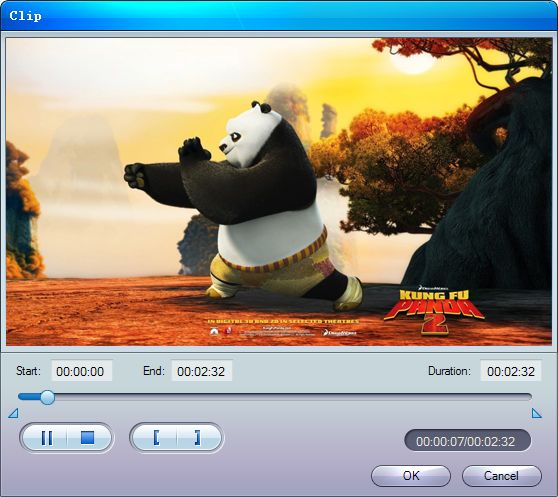
You can reach the video editing tools from the scissors icon and the pencil icon next to the imported file thumbnail. By clicking the scissors icon, you can enter the Trim tab where you can tailor the video to get your favorite segments out of the video to burn to DVD. By clicking the pencil icon, you can get more video editing tools including video cropping, rotating, adjusting aspect ratio, adding watermark, etc.
When finishes customizing the video itself, you can create a good looking DVD menu by choosing a desired template from the DVD menu panel. If you don't choose, the first template will be chosen by default.
If you have chosen a template, please click the icon on the lower left corner on it to reach more advanced tools. There, you can change the background by choosing a local picture. And you can add background music using your favorite music file. In addition, you are allowed to change the button and frame style and type menu title.
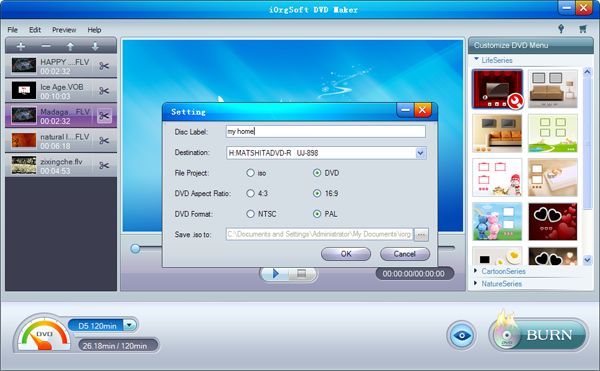
Click the "Burn" button to enter the "Settings" tab. There, please type the Label name, choose destination, choose to burn videos to ISO or DVD disc (If you haven't inserted a blank DVD disc, please choose to burn to ISO), choose the TV standard (PAL or NTSC) and aspect ratio. If you don't want to apply DVD menu template, please check the "No Template" box. Finally, please choose the location to save .iso and cache files and make sure the location you've chosen has enough free space. When everything is done, please click "burn" to start burning to DVD.
Secure Download
Secure Download


Terms & Conditions| Privacy| Sitemap| Contact Us| About Us| Affiliate| Newsletter| License Agreement| Uninstall
Browser compatibility : IE/Firefox/Chrome/Opera/Safari/Maxthon/Netscape
Copyright © 2007-2016 iOrgsoft Studio All Rights Reserved