
How to Recover Lost Files on Mac

Losing files is a common problem encountered by any Mac user. Sometimes, the files get lost for unknown reasons, and sometimes, the files may be deleted accidentally for example "Accidentally tap the Delete All button". No matter for what reasons you lose your files especially those are important to you, it is a disaster to you. But now, do not despair when this happens, it is possible to get the files back if you get proper apps to help you.
In fact, the files that get lost on Mac are not gone immediately, they are still in the drive but hidden by the Mac file-system. The space they occupy is free for adding new files, so, once you lost important files, stop using the drive, or the files you lost previously may be overwritten by the new files, so, you need to recover them as soon as possible. iOrgsoft Data Recovery for Mac (Data Recovery) is the ideal tool to help you recover lost files on Mac.
With the help of iOrgsoft Data Recovery, you can recover almost all files on Mac including photos, videos, documents, songs, archives, emails and so on. No matter for what reason the files are deleted, such as emptying the Trash, deleting via "Command+delete". Lost files on external drives such as SD card, USB drive, digital camera, mobile phones, etc. can also be recovered. To rescue your lost files, this tool can be the best choice for you.
Secure Download
Secure Download
How to recover files on Mac
iOrgsoft Data Recovery software for Mac can help you easily recover lost data on Mac, now download and install this app on your Mac and follow the guide below to have a try.
Choose a recovery mode
Run iOrgsoft File Recovery application after you finish installation, then choose Lost Data Recovery mode. If you are trying to recover files from external storage devices, you need to connect them to your Mac before starting iOrgsoft Data Recovery for Mac.

Select a drive and scan the lost files
Next, select the drive where you lost your files, then hit "Scan" button on the top to scan the lost files on the selected drive. If the drive is not in the list, you need to restart the app.

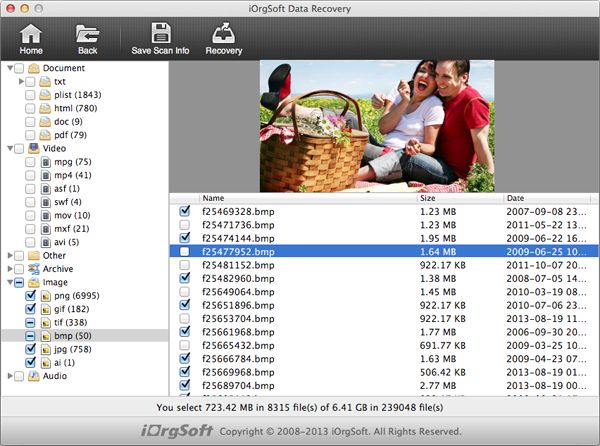
Preview and recover files
After scanning is done, all recoverable files will appear in the categories on the left panel, find your files out there, then preview the files on the top window. To recover a folder, click the checkbox before the folder and hit "Recovery" on the top to recover the lost files.
Related Articles
Hot Article
- How to Recover Data from Formatted Hard Drive on Mac
- How to Recover Lost Files on Mac
- How to Recover Files after System Recovry on Mac
- How to Recover Deleted Items from Trash
- Mac Trash Recovery: Recover Emptied Trash Mac Safely and Easily
- How to Recover Word, Excel and PPT Documents on Mac
- How to Recover Files from SD Card
- Recover Files and Date fast and safe with Mackeeper Alternative-iOrgsoft Data Recovery
- How to Recover Deleted Data from iPhone 4/4S/5
- How to Restore iPhone Photos/Pictures on Mac


